Mounting drum heads
It comes a time in our lives of drummers when we need to replace drum heads. There are lots of reasons to do so, first of all because the old ones are too old, exhausted, or even ruined, and they don't sound good anymore; we may also want to try different models to find the sound that better fits our taste or our repertoire; we may just be filthy rich and replace them once a week just because we can. Whatever your reason may be, there are two things we must do: taking the old heads down and put the new ones on. This is possibly the "easiest" part of the whole drumset maintenance procedures, yet the most tricky in order to get a good tuning.
Warning: don't start replacing your drum heads right after reading this. The following tuning part gives some advices that can be useful in this phase too.
Taking down the old drum heads
Drum heads (all of them) are located between the shell and the hoop. First of all, we need to remove the hoop, which is held in place by a number of lugs attached to the outer shell. It is sufficient to unscrew the bolts with the appropriate tuning key. There are lots of different such keys: simple, robotized, with adjustable friction, and other technologies. I have a very basic one, just slightly better than a 5/32 wrench.
Once we uncrewed all the bolts, taking them out of the lugs but keeping them inside their hoop holes, lift the hoop and put it somewhere, paying attention for the bolts to stay in place, and remembering how it was aligned to the shell. This last thing is quite important because neither the hoop nor the shell are perfectly round. Putting everything back together as it was really helps to reassemble the drum without pain, and to make sure that excessive irregularities don't influence the drum head's health and tuning. Finally, it's time to replace the drum head. If you're just trying different drum heads for a short time, you may want to mark the head-shell alignment. This will make it a lot easier to restore the drum to its initial condition. We can use a permanent marker to write in some hidden place of the drum head's aluminum hoop, and a pencil to draw on the shell.
Mounting the new drum heads
The new head has not yet been deformed by possible eccentricities of the shell, so we can mount it as we like it. For example, I like having the maker's logo facing me, but that's just me, you can do whatever you like. The only important thing to understand is that once the head is settled, and you've been using it for a while, that's the position it'll have to keep.
Once we've chosen the alignment, put the hoop back on the shell. Mind the alignment: we have to match the bolts with the lugs they were into when we removed them. Screw the bolts in until they're finger tight, and make sure they all enter vertically in the lugs. Adjust the head and the hoop to be centered with the shell, and give the bolts a couple of turns with the tuning key.
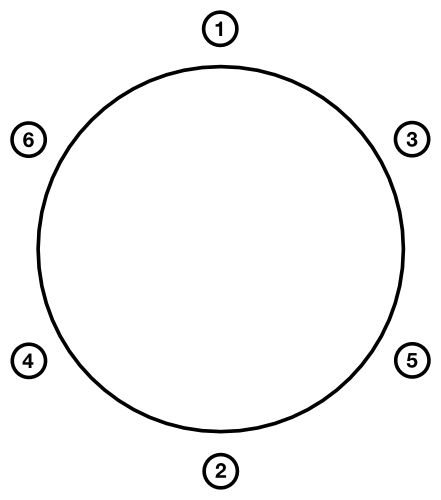
Warning: it is extremely important that, from this moment on, we work on opposite bolts. Ideally we should have two keys and work on each pair of opposite bolts, but we can still work with one key, turning ont bolt and then its opposite, then one of the two adjacent bolts to the first one, and then its opposite one. Sometimes I found myself working with an odd number of bolts, for example seven. Fear not: work as if we have to draw a seven-pointed star. It's suboptimal but it's better than nothing.
Once we turned the key twice, or even three times if we feel it's necessary, we move on to the fear and loathing phase, which is when we begin to settle the head around the shell. Push firmly, but not to heavily, with your hand's palm in the center of the head until you hear a joyful crackle. Repeat the same process, this time with less pressure, near each lug. Keep going until the crackles begin to disappear, but remember they are not going completely away. This is the perfect time to coarse tune the head. We want to make sure that hitting the head about an inch away from each lug produces the same pitch, though it's not yet the time to be overly precise. Now we half-turn each lug up, and repeat the pushing, though this time we should hear much less crackle. At this time it's not important how high the pitch may be, by any chance it's higher than it will be once the head will be correctly tuned.
After repeating the whole process once again, the head should be now perfectly settled and the tuning will last at least for some hours. The first time we mount a new head, we'll have to start over the tuning process about every two hours. After retuning them four or three times, you'll notice the heads stay tuned longer and longer. Now, move on to the actual tuning part.